There aren't any pictures this time. I've been busy sorting through all the knitting machine supplies and making 2 more pair of slippers. I'm also sorting art supplies and re-organizing the studio. meanwhile the house is a mess so there's been a lot of general housework to do as well.
The good news is that I'm ready to start painting again so tomorrows post should be bright and interesting. I'm still considering starting a separate blog for the craft items but am waiting for a bit of feedback from you as to whether or not it's a good idea.
Friday, September 30, 2011
So Many Hobbies , So Little Time
Labels:garden, painting, art
art and craft projects,
debris field,
Housework,
Knitting Machine,
slippers,
studio,
yarn
Wednesday, September 28, 2011
Woodpeckers and warmer weather in the Paintersgarden
The squirrels are still having a lot of fun running around with the walnuts and the woodpecker is back at work remodeling one for the birdhouses that I built and painted last year. The birch leaves turned a pretty gold but dropped right in the yard before we had much of a chance to really enjoy the view from the living room.
With nicer weather I had planned to get out and work on the yard and garden but I got carried away with my mail and the knitting machine so I never quite got around to it.
With nicer weather I had planned to get out and work on the yard and garden but I got carried away with my mail and the knitting machine so I never quite got around to it.
Labels:garden, painting, art
Bird house,
garden art,
letter writing,
Nest boxes,
warm weather
It seemed like a good idea at the time
 |
| These days we're still busy making things. I'm crocheting here and he's untangling yarn for me. |
 |
| Here's a photo from our first house (1978-2000) I hated the look of that air freshener in the hall so I painted that urn around it as part of the mural. |
Labels:garden, painting, art
crocheting,
mural painting,
scrap crafts,
Star Trek
Tuesday, September 27, 2011
Scrap Paper Note Card Project
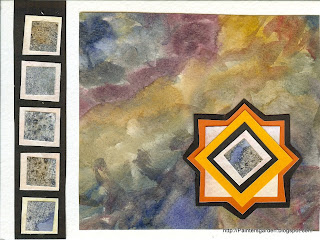
It's surprising what you can make while cleaning up your work area. These were
made from bits of card stock and watercolor paintings mounted over a greeting card.
Since this project uses up scrap items on hand you can be more adventurous with your designs and take more chances, after all-it's not costing you anything but time.
Relax and have some fun with the idea. It's a great way to re-use all those odd cards that come in the junk mail. (if you like the insides but not the cover art).
I can't wait to hear how it works out for you.
Labels:garden, painting, art
art and craft projects,
greeting cards,
paper crafts,
scrap crafts,
watercolor paintig
Monday, September 26, 2011
The Return of the Knitting Machine
I generally finish off my slippers with pom poms, bows or buttons to cover the area where they're all gathered together but I was so excited that I couldn't wait to tell you about it and shot this picture anyway.
Thanks for stopping by and why you're here I do have a question. "since some of my posts aren't about gardening or painting, should I start another blog for crafts and fiber art?"
Sunday, September 25, 2011
An easy to make cover for CPAP tubing
| Finish with a small hem on each end. I usually do that first when the fabric is flat instead of trying to reach inside the tube and do it later but the method you choose is up to you. |
Labels:garden, painting, art
craft projects,
creativity,
decorating,
sewing
Saturday, September 24, 2011
Drawing more Flowers
 |
| I drew iris on the corner of an envelope last night and picked wildflowers on the way back from the mailbox today. I'm planning some drawings and watercolors from them. |
Labels:garden, painting, art
drawings,
watercolors,
wildflowers
Tie Dye to the Rescue
| I'm always getting paint on my clothes and when I don't have any luck getting it out I figure I might as well add some more color. |
| I just did the old shirt (a "jammie" top I've been "living" in all summer) up with rubber bands and twisting. Then began spraying on the dyes. |
| I haven't done this in years but it was fun. |
Labels:garden, painting, art
crafts,
tie dye,
watercolor paintig,
watercolor painting,
wearable art
Friday, September 23, 2011
Winter Studio (the Dining Room)
| I'm settling in for the winter. All of the recent work I had room for has been hung and all of the supplies have been brought in. |
| I sure like the new wall color better than last years, don't you? |
| Not much of a centerpiece at mealtime but i love to have my pencils and brushes handy. |
Labels:garden, painting, art
art supplies,
Dining room,
studio
Preparing for winter in the Paintersgarden
| I've been hoping for years to find a restaurant or coffee shop that wants these. Having them stacked next to the sofa was never a plan... |
Labels:garden, painting, art
acrylic paintings,
old paintings,
Wildlife Habitat,
winter,
yard clean up
Thursday, September 22, 2011
Horizontal Space
| Back in April I had dragged the dining room table in here because the living room has the best light and the most windows of any room in the house. In this picture I'd just received a lot of my merchandise from http://www.Zazzle.com/julia_art* and was using some of the cards to answer my mail. |
| Of course I also had to do a bit of painting in here before the round table headed back to the dining room. |
| As you can see this has been a very busy room. No wonder it felt good to bring the old rocker in here for a few months and relax. I think I'll miss it...if I ever get time to... |
Labels:garden, painting, art
knitting,
painting,
rocking chair,
tables
Wednesday, September 21, 2011
Scrap Project for bits of card stock and watercolors
| My card stock is limited to scraps of assorted sizes and I thought it would be fun to mix them with the results of the salt experiments a few posts back to see what I could come up with. |
 |
| Here's that second card and below is a photo of both cards along with a few other things I'm working on. |
Labels:garden, painting, art
art projects,
art supplies,
http://www.zazzle.com/julia_art*,
scrap crafts,
stationery,
watercolors
The end of the Petunia Project
 |
| As you can see I've added a lot of detail since you saw this project yesterday and yes, I mailed this card to one of my sisters. I just love mail!!! |
 |
| Here's the envelope. Wouldn't you like to see something like this at your mailbox? She's got the original but I'll be making a few products with the images in my http://www.Zazzle.com/julia_art* store so that you can enjoy them too. |
Labels:garden, painting, art
floral paintings,
http://www.zazzle.com/julia_art*,
letter writing,
petunias,
stationery,
watercolor painting
Tuesday, September 20, 2011
Deja Vu and petunias too
Labels:garden, painting, art
petunias,
watercolor painting,
Watercolors.stationery,
zazzle
Monday, September 19, 2011
Back to the Sunflowers
| The centers of the flowers are base coated in Ivory Black |
Labels:garden, painting, art
acrylic painting,
sunflowers
Making Room for Creativity
| Amazingly my hubby decided to get rid of his recliner too and they were gone in minutes!!! It was nice to see people so happy to get them and we're looking forward to the changes in here. |
| There wasn't even time to snap a picture of both chairs. What an interesting way to start a day! |
Labels:garden, painting, art
chairs,
furniture arranging,
hats,
Knitting Machine,
mittens,
scarves,
slippers,
work table
Sunday, September 18, 2011
Sunflowers in the Round materials list and details
| The sketch is done in a round format because I plan to use this painting to design a necklace, key ring, magnets, coasters and stickers. |
| I had some extra white left on my other board so I began using that with the yellow and raw sienna to make the flower petals more prominent. |
Labels:garden, painting, art
acrylic painting,
designing,
step by step instructions,
sunflowers
Subscribe to:
Posts (Atom)


